Physical Address
304 North Cardinal St.
Dorchester Center, MA 02124
Physical Address
304 North Cardinal St.
Dorchester Center, MA 02124

Do you love spending time on the golf course? Are you looking for a way to improve your game? If so, then you need to create a yardage book. A yardage book is a great way to track the distances of each shot and learn the layout of the course.
I will show you how to make a yardage book.
Jim Fyruk once said “Build a Professional Yardage Book. If you haven’t judged the different elevations or the firmness/softness of the greens on your home course in a yardage book, then you’re making a big mistake. This is critical information if you want to score your best, and all it takes is an afternoon, a pad and a pencil. Nail all the variables with your favorite foursome. The more data you can gather, the better.”
Pro’s use a golf course yardage book because of how helpful they are to a players strategy. If you are wanting to shoot lower scores, consider making one of these yardage books to help you plan out your approach for each hole.
Maybe you need to take an extra club on that pesky par 3 to give yourself an easier chip if you mishit. This type of information is missed until you really look at each hole and analyze the easiest way to play the hole.
A yardage book is one of the best golf accessories you can add to your arsenal.
Professional golfers are use yardage books in competition because it gives them the most information possible about a specific hole. Don’t get us wrong – pros love to use rangefinders and GPS’ as well. But nothing works as well as a yardage book.
Making a yardage book is easier than you might think. It will requires some time, effort and software. However, the end result will help you improve the way you navigate your home course and can help you save shots by playing smarter golf.
Making a yardage book will require a few materials.
Physical:
*Optional: Leather Yardage Book
Software:
*Optional: Screenshot application like Snagit
NOTE: With Adobe illustrators 7 day trial, you should be able to create a complete yardage book (maybe even two if you really grind it out) in that time frame.
I personally have not used Affinity designer, however, I have heard good things. At $50 for the software – you really can’t go wrong. I will be testing this software in the future – for this specific task.
Photopea is free, but that is truly its only perk. It isn’t friendly to use for this task and I truly struggled to create a hole using this software. If you have weeks to spend on this project, you may be able to create a yardage book one hole at a time. It is possible, but not recommended.
For any serious golfer, having a reliable yardage book is essential for success on the course.
While there are many different brands and styles to choose from, I highly recommend the Emblemedia Golf Yardage Book.
This tour-quality book uses the same template as many of the top golfers on the PGA Tour, making it an invaluable tool for anyone looking to improve their game.
In addition, the Emblemedia Golf Yardage Book is recommended by golf coaches and sport psychologists for its ability to help players focus and stay confident while they are playing.
With its many features and benefits, the Emblemedia Golf Yardage Book is a must-have for any serious golfer.
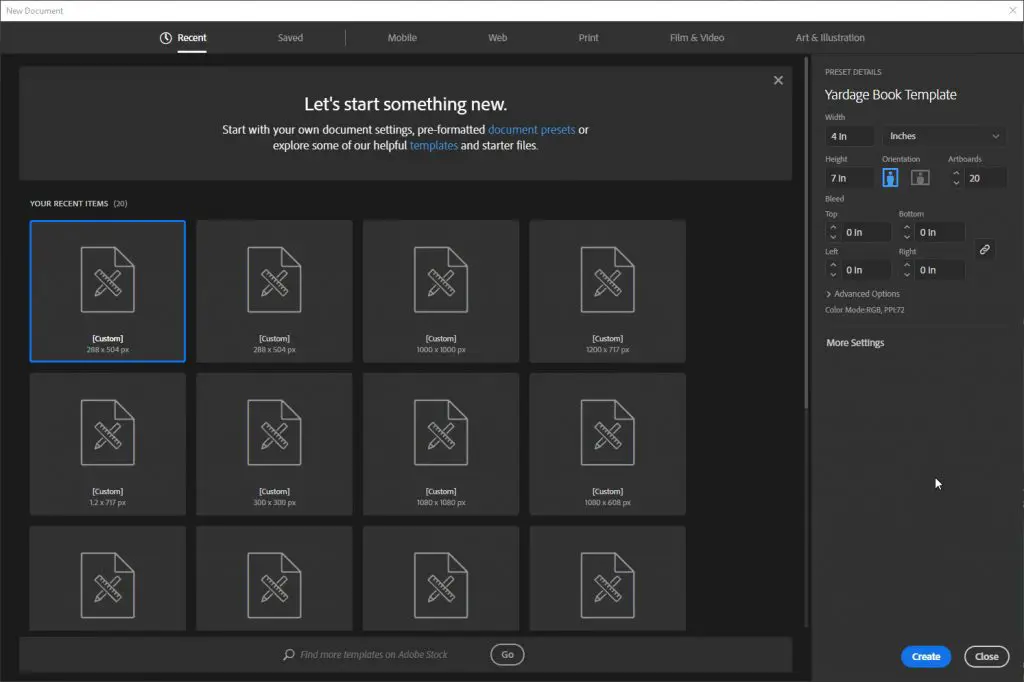
When starting out open your software (in my case – adobe illustrator) and name your file. You will then want to create 20 art boards all 4 in x 7 in. This is the size that I use.
You will want to check the dimensions of the yardage book cover you have and make sure that this size works. If not adjust the art boards to the size that will work for you.
Here is my template that you can use to get started
When you are done setting up your art boards you will want to then create 20 layers or one layer for each page of your yardage book.
When you have each layer – add a logo to the front page and then start adding in your basic details for each hole. These details include:

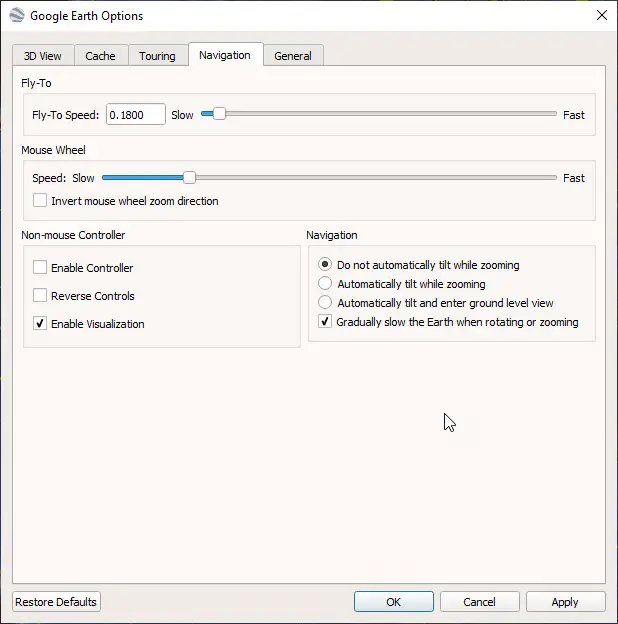
Open Google Earth Pro. Before you start taking photos of the holes, you will need to adjust some settings to make it easier on you.
Go to the top navigation bar and click on Tools. From tools click “Options”.
Go to the “Navigation” tab in Google Earth Options and then click “Do not automatically tilt while zooming”. This will save you a lot of heartache.
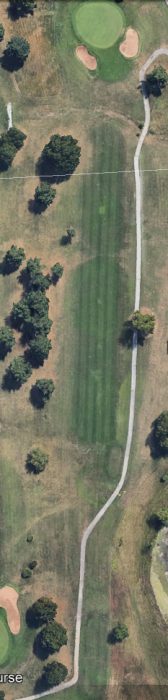
Now that you have your setting configured. You can then search for your course and go to hole 1. In the top right corner, click on the down arrow below the eyeball to make sure that your camera is not tilted at all.
You can view the hole however it looks best to you, I put the tee box at the bottom of my screen and the green at the top. Take a screenshot using the print screen button on your computer or a screenshot application that you have downloaded on your computer.
You will want to include a few surrounding features such as the cart path, trees, bunkers and water. Be sure to have a few features that you can add to each hole. This will make adding yardages easier.
Save the photo under a filename that will make sense to you.

Now that you have each hole saved as an image. Load each photo into their own layers.
Size them to each art board. When you have the hole sized to the art board, go into the layer of the art board and LOCK the photo. Click the space to the right of the eye on the art board and a padlock should appear.
See the example provided. This will allow you to sketch over the photo without it moving on you.
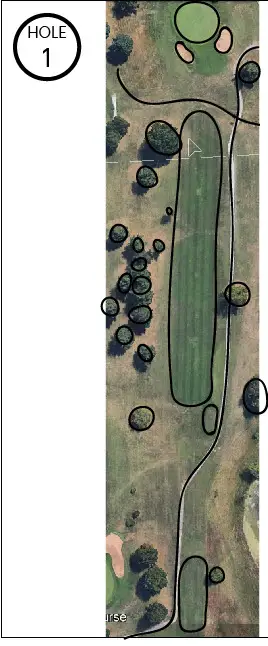
Once you have each photo locked and the rest of the layer is unlocked you are now ready to start sketching over the hole and it’s features. In adobe – press ‘b’ to open the brush tool. Start with a tee box and sketch around the teebox.
When you have the tee box sketched you press ‘v’ on your keyboard to open the selector tool and then right click on your outline. You should have an option to ‘join’. Click this option. You now have a solid object.
Here is the key to making these yardage books look good: Now that you have a solid object, press ‘b’ on your keyboard to reopen the brush tool.
This time, press and hold the alt key and your brush tool should change into the smoothing tool.
Smooth the edges of your tee box by holding down ‘b+alt’ and left clicking through the points that appear on your object until you are happy with how the object looks. Outline everything in the photo using this process.
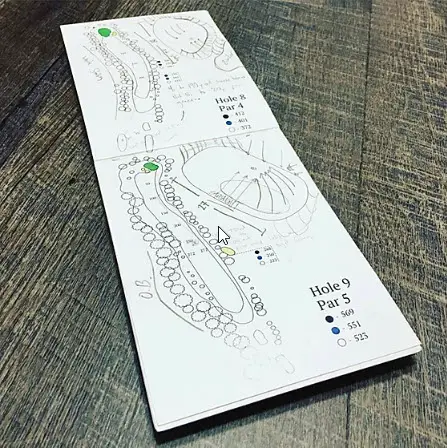
When you are done, you should have something similar to the example.
Important: Make sure you make everything a joined object – excluding cart paths and streams that may run through a hole.
You may want to watch some Youtube videos on adobe if you are lost at any point.
After you have everything outlined, press ‘v’. Hold the shift button down and select every solid object (do not select the cart path or streams) and look to the left bar. There will be two boxes one black and one white – layered on top of each other.
Then to the bottom left of those boxes, there is a duplicate set of icons.
Click on the smaller icons. This should fill all of the objects on your art board with a background – while keeping the outline.
Go to the top navigation with everything selected and then remove the stroke to each object (scroll down on your mouse while the stroke is highlighted). You should see objects without outlines.
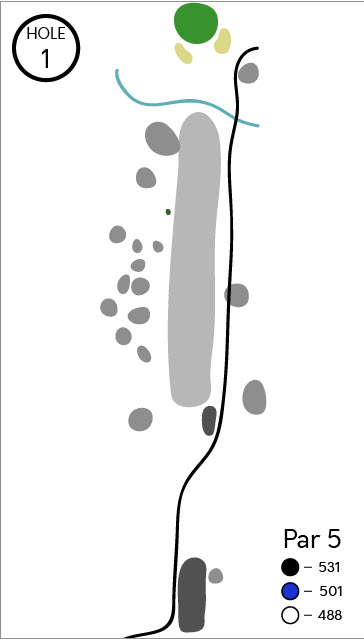
Now you can add color to these objects. At the end, you should have something similar to the example provided.
Here are the color hexcodes I use:
Grayscale
Color
When you FINALLY have all of the holes outlined and filled in you are now ready to add in your yardages. This is going to require us going back to Google Earth Pro (GEP) and going back to hole 1. You will want to reconfigure GEP with the same settings listed above.
With Illustrator open, press the ‘t’ button to open the text tool and just type 100. To the left of that dot, press ‘L’ to open the ellipse tool and hold down shift. Make a small circle to the left of your 100 not any bigger than the text.
Press ‘v’ to open the selector tool and grab both objects then right click and press “group”. This is now your “yardage dot template” that you can use for measuring and marking any distances.
Now that you are at hole 1, click the ruler on the top bar and click the back of the tee box you are measuring. Click and drag. Do you see how the tool is measuring for you? Measure from the back of the tee box to your usual driver carry and then add in a yardage dot. Press the ‘a’ button, select ONLY the text and press ‘delete’ – now you have a marker to show you your average carry distance.
Back in Google Earth you can then start figuring out carry distances from your dot or to other objects that you have labeled (like to trees, water, sand traps). At this point you should have all of the tools that you create the yardages that you want/need.
When you have everything mapped out on your book – you are ready to print. You can contact a local printer that can print and cut everything to size for you – or you can print the book on paper yourself and cut it to size using the tools listed above.
When you finish printing you will need to measure and cut the book to size. Be careful cutting and do not hurt yourself.
After cutting the paper, line everything up and use your stapler to staple everything down. You may want to use two or three staples to make sure the book is not going to come undone. Be sure to use plenty of force on the stapler to make sure that the staples go all the way through.
Congratulations! You are now done with your yardage book!
Golfers of all levels struggle with keeping track of distances while playing. This can lead to frustration and slower play.
Yardage books are a must for any golfer, but they can be expensive and time consuming to create on your own.
My printable golf yardage book template is the perfect solution! This easy-to-use template includes all the information you need to keep track of your distances while you play.
Plus, it’s free to download and easy to print.
Fill out the form above to download a printable golf yardage book template.
No not all golf courses have yardage books. Most prestigious courses carry them. However, it never hurts to ask the club pro if they have any laying around.
Yes, yardage books are legal for tournament play. In fact, professional golfers are not allowed to use any rangefinders or GPS devices – they have to rely on yardage books.
Yes, green reading books are legal for tournament play.
Making a yardage book can take a TON of time. I think yardage books can really help you figure out a course and how you need to naviagte certain holes. I would not suggest making a yardage book for every golf course you play – that would take forever and each book would not be 100% accurate.
To be honest, your first run at a yardage book is going to have some errors somewhere. You will mess up a distance, misplace a marker, forget a tree.
But you shouldn’t get discouraged. Making a yardage book is so beneficial, not only because it makes you actually sit down and look at all of the yardages, but when you are revising – you truly are studying the course and will learn how to play smarter golf.
In the end, smarter golf will lead to lower scores and isn’t that what we are all after?